Mi compra de un "Soporte Araña" marca genérica🎙🎙 | Unboxing y colocación | ES-EN

Introducción
¡Hola! ¿Qué tal, crypto amigos? ¿Cómo están? ¡Yo espero que muy bien! Como sabrán hace poco adquirí un micrófono nuevo para mi set-up de grabación, el HyperX Solo cast, si no viste el unboxing del mismo te la voy a dejar por acá. He de admitir que él mismo es muy buen equipo para poder grabar mi voz, estoy bastante conforme, pero no pude evitar darme cuenta que la membrana que lo recubre es muy sensible a las vibraciones, es por eso que decidí buscar tutoriales de como configurar el micrófono bien en el programa de grabación que yo utilizo para que no se escuche éstos ruidos tan molestas para el oído humano. Configuré lo mejor que pude el producto pero no mejoró casi nada ¿Qué es lo que pasaba? Básicamente lo que sucedía era que cuando yo hablaba y escribía o me movía simplemente con "WASD" en un juego se escuchaba el ruido del teclado muy fuerte, a pesar de todos los filtros y configuraciones que hice. Busqué en internet la solución y he aquí el post de hoy, un "Soporte Araña" para micrófonos con condenser, es una marca genérica y su modelo es el LM21, en éste post voy a mostrarles el unboxing del producto en cuestión y en adición a comentar mi experiencia y los cambios notados.
Cambiando de tema, si te interesa ver más review y/o unboxing de productos altamente recomendados, te voy a dejar acá abajo los que ya he realizado en mi blog. Simplemente con hacerle click sobre el título del video que te interese te va a redireccionar automáticamente al mismo.
Listado de Blogs
| Blogs | Link directo | Fecha de subida |
| Blog 1 | ¡Mi primer Joystick inalámbrico! | 30 de Junio |
| Blog 2 | ¡Mis primeros auriculares inalámbricos! | 16 de Julio |
El producto llegó
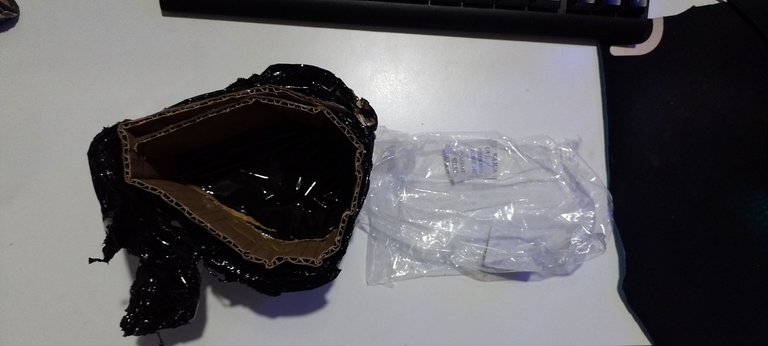
He de admitir que al ser un artículo genérico la forma en que venía no era muy estética, realmente quedé sorprendido que fuera tan mala, simplemente estaba dentro de una bolsa plástica transparente que a su vez se encontraba en un paquete hecho con pedazos de caja y envuelto en una bolsa de nylon negra, la presentación era muy mala, pero bueno no se puede esperar mucho de ésta clase de productos que no son de una marca conocida, aclarar que eran los únicos disponibles en Mercado Libre para éste tipo de micrófonos, se ve que no hay grandes empresas detrás de la producción de éste producto.


¿Qué había dentro del envoltorio?
Bueno para serles sinceros, nada, simplemente el producto envuelto en una bolsa plástica como les había comentado y un gel de éstos que vienen para la humedad, como les decía al ser genérico por lo general sus presentaciones son malas, comparadas con productos de marcas.
Presentación del producto: 1/10
¿Qué es un soporte araña?
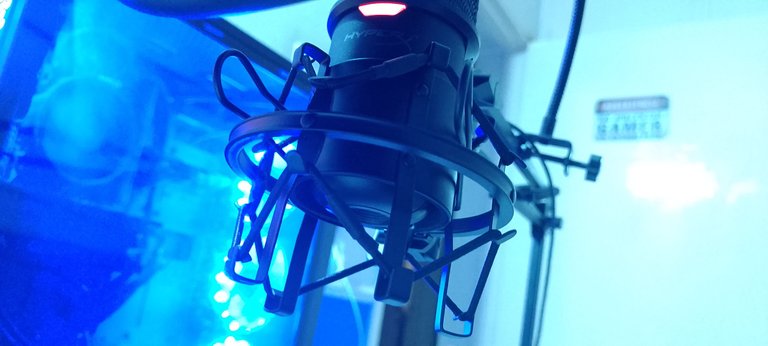
Como les comentaba, su nombre es así debido a los elásticos que conforman éste producto, como pueden observar su forma es similar a una tela de araña, y he de ahí su nombre. Su función es esa, contener el sonido vibracional del ambiente, tanto sea de golpes, movimientos bruscos del mouse, movimientos del escritorio y el que ya nombré que es el sonido de nuestras teclas a la hora de escribir o jugar a través de ésta suspensión elástica que tiene. Se puede observar como presiono dos palanquitas, éstas sirven para hacer el agujero donde va el micrófono mas ancho así él mismo puede entrar sin problenmas. Si quieren saber más detalles técnicos del mismo, les voy a dejar a continuación la página por donde la compre.
Rosca universal
Algo a destacar de éste producto es que la rosca que viene en la parte inferior es la universal, es decir, sirve para cualquier pie de micrófono o brazo mecánico. Eso era algo bastante importante que busqué antes de adquirir el producto debido a que tenía que confirmar si el artículo encajaba o no con el brazo mecánico que tengo yo hace bastante. Más que nada me terminó convenciendo esto.
Colocando el Soporte Araña
1° Retirar el micrófono
Como primero paso antes de colocar el soporte de araña en el brazo mecánico, tenía que retirar el micrófono del lugar donde estaba colocado, simplemente haciendo giros y desajustando sale con total normalidad. Recomiendo siempre hacer éste tipo de trabajos con dos manos para evitar que se nos caiga el micrófono del lugar donde lo estamos queriendo sacar.
2° Colocar el soporte araña
El siguiente paso es colocar el soporte en el brazo mecánico, para ello simplemente debemos poner la rosca sobre el piquito que quedó descubierto del brazo y empezar a girar el soporte araña hasta que quede bien ajustado, luego de que quede bien colocado, procederemos a ajustar la manijita que trae en un costado para que no se nos mueva para arriba ni para abajo. Muy simple y sencillo.

3° Poner el micrófono
Como último paso deberemos apretar las patitias que les mostraba anteriormente e incrustar el micrófono en el agujero cilíndrico que se encuentra en el soporte, sin hacer muchas presión debería entrar sin problemas. Y listo, conectamos el mic, ajustamos un poco a nuestra altura preferida ya estaría listo para usarse.

Conclusiones y experiencia personal
Es una buena inversión el adquirir éste tipo de productos a la hora de querer mejorar nuestro lugar de grabación, a mi en lo personal me ha venido muy bien ya que se nota muchísimo la diferencia entre tenerlo o no con respecto a las vibraciones, lo he estado probando en diferentes gameplays y si van a ver mi último video de Golf with Your Friends se van a dar cuenta del cambio.
Palabras finales
Quiero agradecer a todos y cada uno de ustedes por siempre apoyar mi contenido, ya que ésta compra fue realizada con mis ganancias en Hive, estoy muy contento por eso, jamás pensé que en mi vida fuera a pasarme algo así.
En un próximo post voy a traer la review del micrófono y consecuente a ese la diferencia entre tener o no un soporte araña, estén atentos para no perderse éste análisis así no les quedan dudas de que realmente es una muy buena compra.
Les deseo a todos un bonito día y espero que hayan disfrutado el blog y el video.
Créditos
La imágen principal del post es una foto mía tomada en mis MOTOG20 y editada en Photoshop.
Las fotos del post fueron realizadas con mi MOTOG20.
Los gif son pedazos de vídeo grabados con mi ceular MOTO G20 y elaborado con ésta página.
Los separadores que dicen "CRYPTO ALVIRIN" fueron realiados por mí en Photoshop e Illustrator.
El logo del canal fue realizado por mí en Illustrator.

Introduction
Hello! What's up, crypto friends? How are they? I hope very well! As you may know, I recently purchased a new microphone for my recording set-up, the HyperX Solo cast, if you didn't see the unboxing of it I'm going to leave it here. I have to admit that it is a very good equipment to be able to record my voice, I am quite satisfied, but I could not help realizing that the membrane that covers it is very sensitive to vibrations, that is why I decided to look for tutorials on how to configure the microphone well in the recording program that I use so that these noises that are so annoying to the human ear are not heard. I configured the product as best I could but it didn't improve much at all. What was happening? Basically what was happening was that when I was talking and typing or just moving with "WASD" in a game the keyboard noise was very loud, despite all the filters and settings I made. I searched the internet for the solution and here is today's post, a "Spider Stand" for condenser microphones, it is a generic brand and its model is LM21, in this post I am going to show you the unboxing of the product in question and in addition to comment on my experience and the changes noticed.
Changing the subject, if you are interested in seeing more reviews and/or unboxing of highly recommended products, I am going to leave you below the ones that I have already made on my blog. Simply by clicking on the title of the video that interests you, you will be automatically redirected to it.
List of Blogs
| Blogging | Direct link | Upload Date |
| Blog 1 | My first Wireless Joystick! | June 30 |
| Blog 2 | My first wireless headphones! | July 16 |
The product arrived
I have to admit that being a generic article, the way it came was not very aesthetic, I was really surprised that it was so bad, it was simply inside a transparent plastic bag that in turn was in a package made with pieces of box and wrapped in a black nylon bag, the presentation was very bad, but well you can't expect much from this kind of product that is not from a well-known brand, clarify that they were the only ones available in Mercado Libre for this type of microphones, sees that there are no big companies behind the production of this product.
What was inside the wrapper?
Well, to be honest, nothing, just the product wrapped in a plastic bag as I had told you and one of these gels that come for humidity, as I was saying, being generic, their presentations are usually bad, compared to brand products.
Product presentation: 1/10
What is a support spider?
As I was telling you, its name is due to the elastics that make up this product, as you can see its shape is similar to a spider web, and hence its name. Its function is that, to contain the vibrational sound of the environment, whether it be blows, sudden movements of the mouse, movements of the desktop and the one that I already named, which is the sound of our keys when typing or playing through this elastic suspension what's wrong with it. You can see how I press two levers, these are used to make the hole where the microphone goes wider so that it can enter without problems. If you want to know more technical details about it, I will leave you below the page where you bought it.
universal thread
Something to highlight about this product is that the thread that comes in the lower part is universal, that is, it is used for any microphone stand or mechanical arm. That was something quite important that I looked for before purchasing the product because I had to confirm if the item would fit or not with the mechanical arm that I have had for quite some time. More than anything I ended up convincing this.
Placing the Spider Bracket
1° Remove the microphone
As a first step before placing the spider mount on the mechanical arm, I had to remove the microphone from the place where it was placed, simply making turns and loosening it comes out normally. I always recommend doing this type of work with two hands to prevent the microphone from falling from the place where we are trying to get it out.
2° Place the spider support
The next step is to place the support on the mechanical arm, for this we simply have to put the thread on the beak that was left uncovered from the arm and start turning the spider support until it is well adjusted, after it is well placed, we will proceed to adjust the small handle that it has on one side so that it does not move up or down. Very simple and straightforward.
3rd Put the microphone
As a last step we will have to tighten the patitias that I showed you before and embed the microphone in the cylindrical hole that is in the support, without doing much pressure it should enter without problems. And ready, we connect the mic, adjust a little to our preferred height and it would be ready to use.
Conclusions and personal experience
It is a good investment to acquire this type of product when it comes to wanting to improve our recording location, personally it has been very good for me since the difference between having it or not with respect to vibrations is very noticeable, I have I've been trying different gameplays and if you go to see my last video of Golf with Your Friends you will notice the change.
Final words
I want to thank each and every one of you for always supporting my content, since this purchase was made with my earnings on Hive, I am very happy about that, I never thought that something like this would happen to me in my life.
In a future post I am going to bring the review of the microphone and consequently the difference between having or not having a spider support, be attentive so as not to miss this analysis so you have no doubts that it really is a very good purchase.
I wish you all a nice day and I hope you enjoyed the blog and the video.
Credits
The main image of the post is a photo of me taken on my MOTOG20 and edited in Photoshop.
The photos in the post weremade with my MOTOG20.
The gifs are pieces of video recorded with my MOTO G20 cell phone and made with this page.
The dividers that say "CRYPTO ALVIRIN" were made by me in Photoshop and Illustrator.
The channel logo was made by me in Illustrator.

https://twitter.com/2363262020/status/1578927719441522688
The rewards earned on this comment will go directly to the people( @cryptoalvirin ) sharing the post on Twitter as long as they are registered with @poshtoken. Sign up at https://hiveposh.com.
¡Siempre mejorando hermano, esa es la actitud de ganador que brilla en vos!
Hola mi bro! Muchas gracias por el comentario, me motiva! Gracias gracias gracias!!
Estoy DEMASIADO feliz leyendote que lograste agregarle algo súper necesario a todo tu equipo de grabación y trabajo ufff se vienen cositaaas JAJAJA de verdad lograrás mas y más sin miedo a nada, porque te lo mereces y porque lo trabajas, SABES QUE TE QUIEROOO CUIDATEEE
Hola Shanita! Muchas gracias amiga, me alegra mucho que te haga feliz el verme progresar 🤣❤️. Genia amiga! También te quiero, saludos.
Alvaro, Magnifica forma de redactar tu experiencia. Felicidades por eso y por tu adquisicion.
Y, un adelantado fuiste dejando El link de tus otros umboxing 😂😂, ya mismo me Paso por alla para disfrutar de ese material.
Un Abrazo
Hola broo! Muchas gracias por la apreciación. Bueno bro espero los unboxing te sirvan de algo, es la idea del blog también. Saludos pana! Se agradece el comentario.
felicitaciones por la compra bro, que lo disfrute !PGM !LOL
BUY AND STAKE THE PGM TO SEND A LOT OF TOKENS!
The tokens that the command sends are: 0.1 PGM-0.1 LVL-0.1 THGAMING-0.05 DEC-15 SBT-1 STARBITS-[0.00000001 BTC (SWAP.BTC) only if you have 2500 PGM in stake or more ]
5000 PGM IN STAKE = 2x rewards!
Discord
Support the curation account @ pgm-curator with a delegation 10 HP - 50 HP - 100 HP - 500 HP - 1000 HP
Get potential votes from @ pgm-curator by paying in PGM, here is a guide
I'm a bot, if you want a hand ask @ zottone444
lolztoken.com
He was just going through a stage.
Credit: reddit
@cryptoalvirin, I sent you an $LOLZ on behalf of @pablodare
Delegate Hive Tokens to Farm $LOLZ and earn 110% Rewards. Learn more.
(1/8)
Gracias pablo!
¡Enhorabuena!
✅ Has hecho un trabajo de calidad, por lo cual tu publicación ha sido valorada y ha recibido el apoyo de parte de CHESS BROTHERS ♔ 💪
♟ Te invitamos a usar nuestra etiqueta #chessbrothers y a que aprendas más sobre nosotros.
♟♟ También puedes contactarnos en nuestro servidor de Discord y promocionar allí tus publicaciones.
♟♟♟ Considera unirte a nuestro trail de curación para que trabajemos en equipo y recibas recompensas automáticamente.
♞♟ Echa un vistazo a nuestra cuenta @chessbrotherspro para que te informes sobre el proceso de curación llevado a diario por nuestro equipo.
Cordialmente
El equipo de CHESS BROTHERS
vaya ni me imaigne nunca q existia esta clase de productos =)
Así es amigo, existen y son muy útiles.
buenisima inversion hermano, tambien eh comprado el mio recientemente, realmente le da mejor estetica y reduce las vibraciones, suerte grabando con eso, seguro que quedan chulas tus grabaciones
Hola broo! Muchas gracias eh, si la verdad es que vale la pena totalmente, son muy necesarios, que bueno que vos también tengas uno! Saludos amigo.
¡Felicidades por esa nueva adquisición Alvirinnnnnn! 👏👏👏👏 me encanta cuando mis amigos son felices comprando cosas que les gustan y además les servirán para mejorar sus trabajos (aplausossss) 🤗🤗.
Ya veo que en Argentina en verdad le dan importancia a los envíos cuando las cosas son de calidad, como olvidar esa tarjeta de @bananasfallers que era más grande que él el empaque 😅😅😅 o los equipos que tu has comprado también que se ven muy bien envueltos en comparación con este, pues aquí en venezuela hay una alta probabilidad de que todos lleguen como esta araña, así cuesten lo que cuesten, o sencillamente se pierdan en el transito y nunca lleguen 🙃.
La verdad siempre había visto esa cosita en los microfonos y nunca supe para que servían 🤔, incluso pensé que eran por estética algo así como un skin nuevo de esos que se les pone a los personajes de video juego 🤭🤭, uno siempre aprende con ustedes cosas nuevas chicos.
Disfruta tu nuevo súper sonido con ese mega micro con camisa nueva amigoooo 😅😅😅 ¡abrazo @cryptoalvirin !
Amiga! Muchas gracias, me alegra mucho que te encanta ver progresar a los amigos, sos un ser muy bueno y puro 💙.
Si es cierto, el envío de marcas por lo menos acá en Argentina son buenos ya que las empresas que lo realizan son privadas y no estatales xdd. Lo de Bananas fue hermoso, un empaque simplemente bello, no se puede esperar menos realmente. Que malas noticias amiga 😞.
Jajajajaj un skin para los micrófonos! Muy bueno jajaaja, si amiga yo también desconocía su función hasta que averigüe realmente para que servían buscando soluciones a mi problema, así que tampoco me voy a reír tanto 😂.
Muchas gracias amiga, de verdad tus comentarios son muy motivadores, saludos!
Hermano felicidades por tu adquisicion, por cierto me gusta como tratas de mejorar cada vez mas para ofrecer mayor calidad, eso te llevara lejos,felicidades bro :D
Una compra altamente segura y bastante provechosa. Un soporte de araña es indispensable en el apartado de sonido y gracias w este "accesorio" se pueden mitigar muchos de los ruidos molestos causados por las vibraciones del ambiente. Excelente inversión y que le saques el máximo provecho !PIZZA