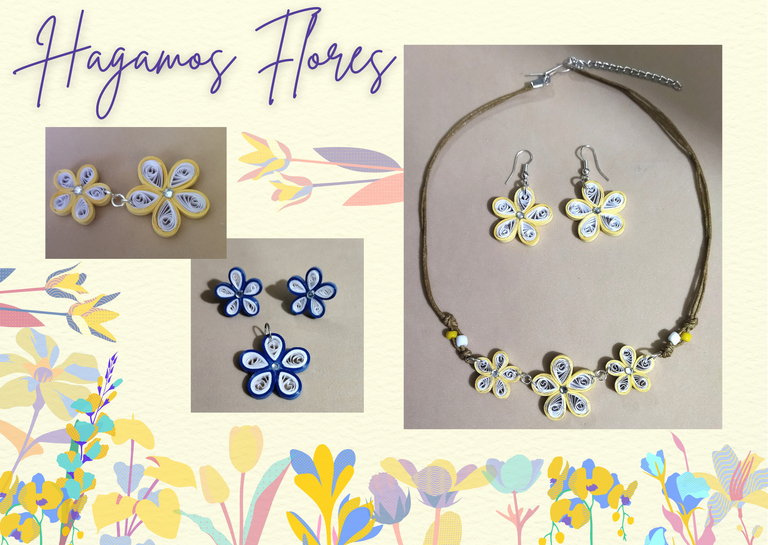
🌼 Hagamos Flores. Collar y zarcillos. Técnica de Quilling/ Tutorial, paso a paso. // 🌼 Let's make Flowers. Necklace and tendrils. Quilling technique/ Tutorial, step by step.
🍃🌼🌼🌼🍃
Hola a todos... 🐱🐾💕
Hola mis queridos Hivers, y a toda mi bella comunidad de artistas de #Hivediy. Un placer como siempre encontrarme por acá para mostrarles mi trabajo realizado con tanto amor y cariño, especialmente para ustedes. Esperando que esta semana santa, o semana de pascuas, sea para ustedes unos bonitos días de reflexión, descanso, compartir en familia o con amistades, y sobre todo de bendiciones.
Para el día de hoy les traigo un bonito conjunto de flores de 5 pétalos, a partir de un circulo abierto muy fácil de elaborar, pensando en que viene el día de las madres, y es el momento preciso para ir adelantando los detalles para esa persona especial, así como también pueden elaborarlo para dar un detalle en cualquier ocasión, para uso personal, o también para la venta.
Hello everyone... 🐱🐾💕
Hello my dear Hivers, and to all my beautiful community of #Hivediy artists. A pleasure as always to meet you here to show you my work made with so much love and affection, especially for you. Hoping that this holy week, or Easter week, will be for you a beautiful days of reflection, rest, sharing with family or friends, and above all blessings.
For today I bring you a nice set of flowers of 5 petals, from an open circle very easy to make, thinking that Mother's Day is coming, and it is the right time to go ahead with the details for that special person, as well as you can also make it to give a detail on any occasion, for personal use, or also for sale.
🍃🌼🌼🌼🍃
Comencemos: 😃🌺🌼
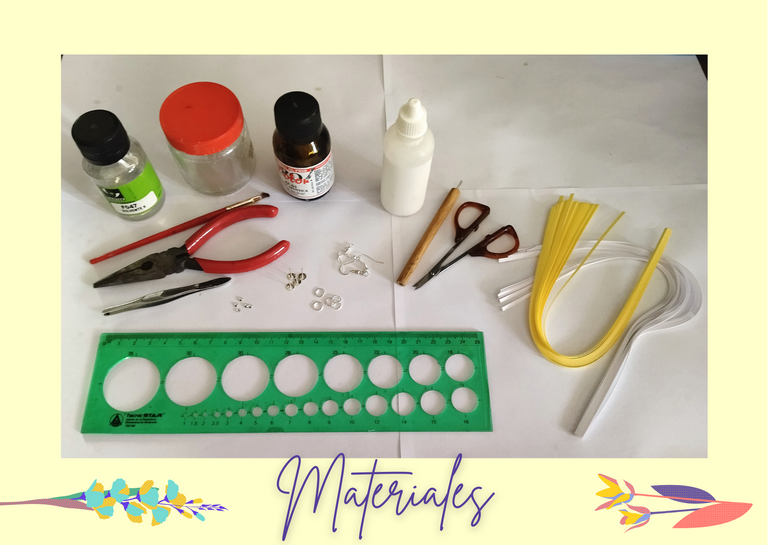
Materiales:📏✏️✂️
• Cintas de quilling de 3mm de ancho, amarillo pastel, y blancas (o del color de tu preferencia).
• Aguja para quilling.
• Pega blanca.
• Tijera.
• Regla con diversas medidas de circunferencia.
• Cristales para bisutería.
• Pinza punta fina.
• Base para zarcillos fija, y colgantes (anzuelos).
• Argollas pequeñas y medianas de bisutería.
• Alicate punta fina.
• Solvente X.
• Resina Artística.
• Frasco de vidrio.
• Pincel.
Let's get started: 😃🌺🌼
Materials:📏✏️✂️
- 3mm wide quilling ribbons, pastel yellow, and white (or the color of your choice).
- Quilling needle.
- White glue.
- Scissors.
- Ruler with different circumference measures.
- Jewelry crystals.
- Fine tip tweezers.
- Base for fixed tendrils and pendants (hooks).
- Small and medium size jewelry rings.
- Fine point pliers.
- Solvent X.
- Artistic resin.
- Glass flask.
- Brush.
🍃🌼🌼🌼🍃
🍃🌼🌼🌼🍃
Paso a paso:💖
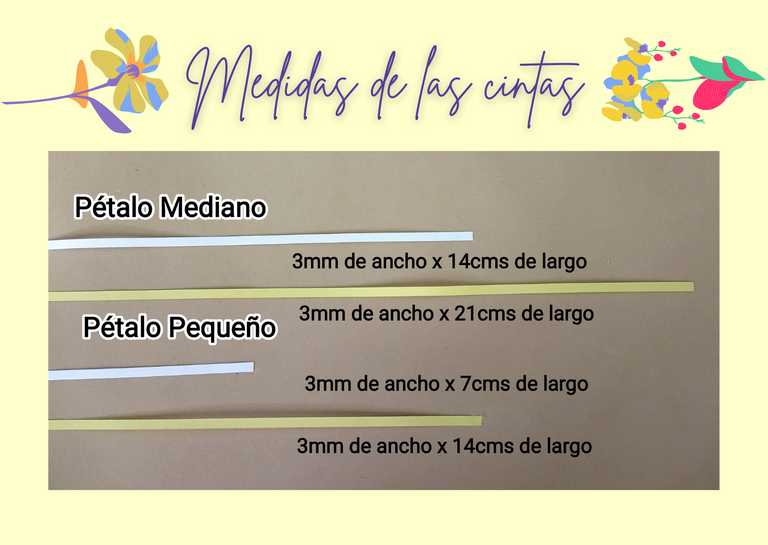
Medidas de las cintas:✨
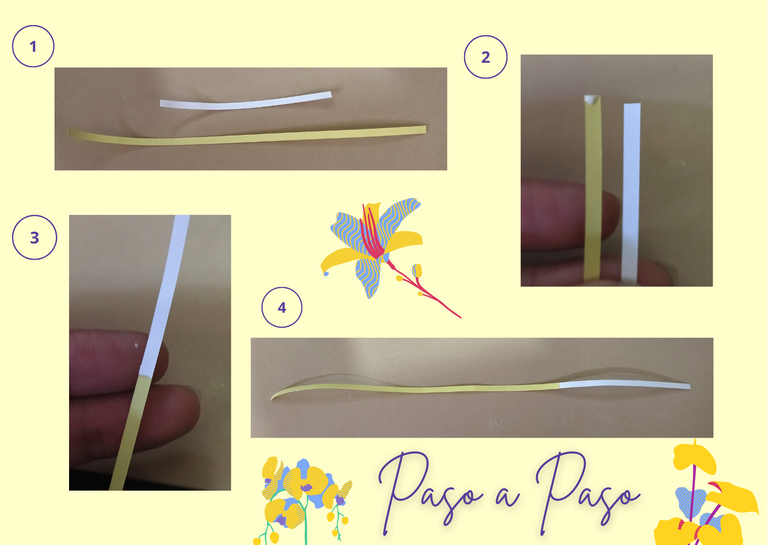
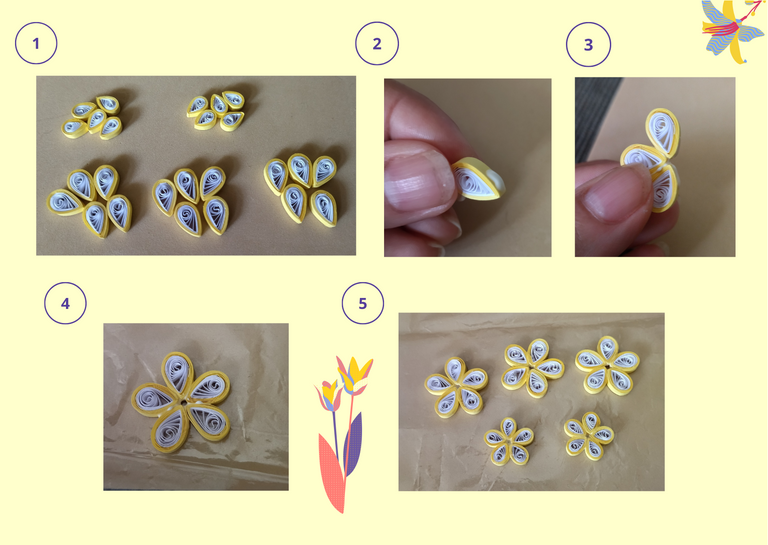
• Vamos a necesitar cintas de quilling de 3mm de ancho de color amarillo pastel y blanco, como indica en la foto, para los pétalos que en total son 5 para cada pieza tanto la pequeña como la mediana, comenzamos midiendo, 7cms de largo de color blanco, y 14cms de largo de color amarillo esto para los pétalos pequeños, y 14cms de largo de color blanco y 21cms de largo de color amarillo pastel para los medianos.
Step by step:💖
Ribbon measurements:✨
- We are going to need 3mm wide quilling ribbons of pastel yellow and white color, as indicated in the photo, for the petals that in total are 5 for each piece both small and medium, we start by measuring, 7cms long in white color, and 14cms long in yellow color this for the small petals, and 14cms long in white color and 21cms long in pastel yellow color for the medium ones.
🍃🌼🌼🌼🍃
🍃🌼🌼🌼🍃
• Una vez medido el quilling, procedemos a crear una sola cinta uniendo ambas con un punto de pega.
- Once the quilling is measured, we proceed to create a single ribbon by joining the two with a glue stitch.
🍃🌼🌼🌼🍃
🍃🌼🌼🌼🍃
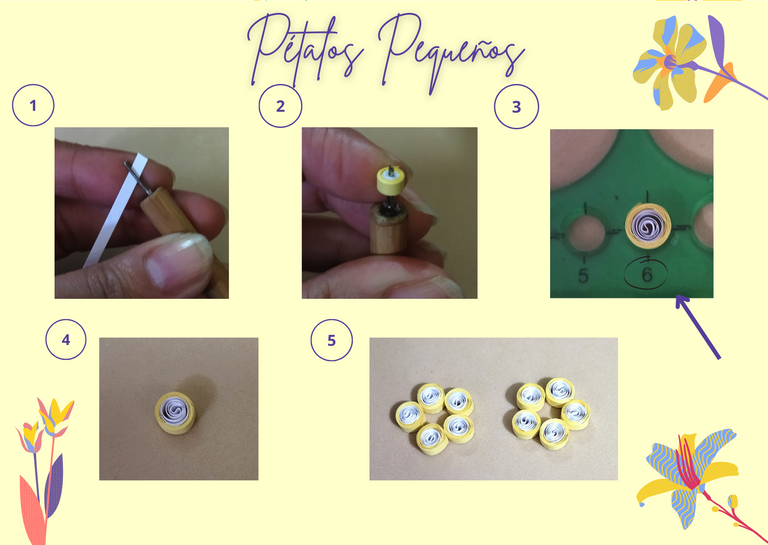
Para la flor pequeña (pétalos): 🍃
• Una vez unidas nuestras cintas, la blanca de 3mm x 7cms de largo y la amarilla de 3mm x 14cms de largo, tomamos nuestra aguja de quilling vamos a comenzar por el extremo blanco y enrollamos hasta llegar al final de la amarilla, tomamos la regla de circunferencias y colocamos en el círculo número 6, de esta manera vamos a obtener un círculo abierto, sacamos de la regla con sumo cuidado y procedemos a sellar nuestro circulo con pega. Para el conjunto que vamos a realizar vamos a necesitar dos flores pequeñas, es decir que vamos a elaborar bajo el mismo procedimiento, 10 círculos abiertos con estas medidas.
For small flower (petals): 🍃
- Once our ribbons are joined together, the white 3mm x 7cms long and the yellow 3mm x 14cms long, we take our quilling needle we are going to start with the white end and roll until we reach the end of the yellow one, we take the circumference ruler and place in the circle number 6, in this way we are going to obtain an open circle, we take out of the ruler with extreme care and proceed to seal our circle with glue. For the set that we are going to make we will need two small flowers, that is to say that we are going to elaborate under the same procedure, 10 open circles with these measures.
🍃🌼🌼🌼🍃
🍃🌼🌼🌼🍃
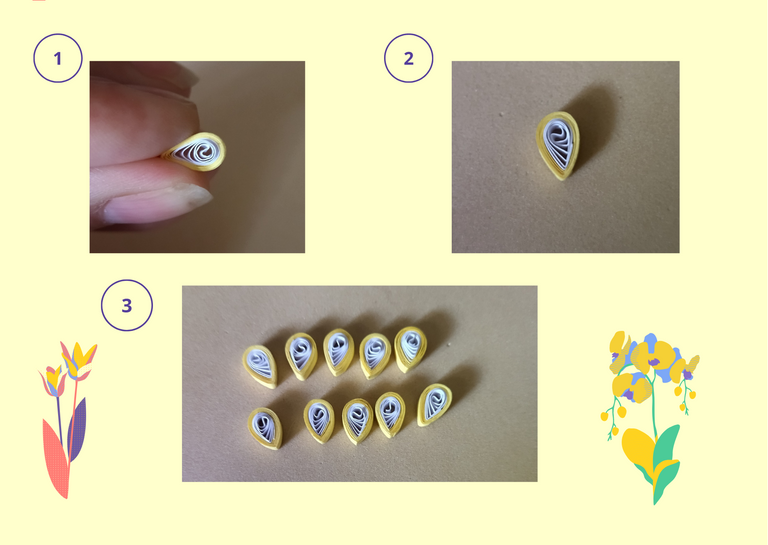
• Vamos a darle forma a nuestros círculos abiertos para poder formar nuestra flor, en este caso vamos a realizar una gota, con la ayuda de nuestros dedos índice y pulgar pellizcamos uno de los extremos del circulo y de esta manera tendremos nuestra gota, hagamos lo mismo con los demás círculos restantes, estos serán los pétalos de la flor, (reservemos).
- We are going to shape our open circles to form our flower, in this case we are going to make a drop, with the help of our index finger and thumb pinch one of the ends of the circle and in this way we will have our drop, do the same with the other remaining circles, these will be the petals of the flower (reserve).
🍃🌼🌼🌼🍃
🍃🌼🌼🌼🍃
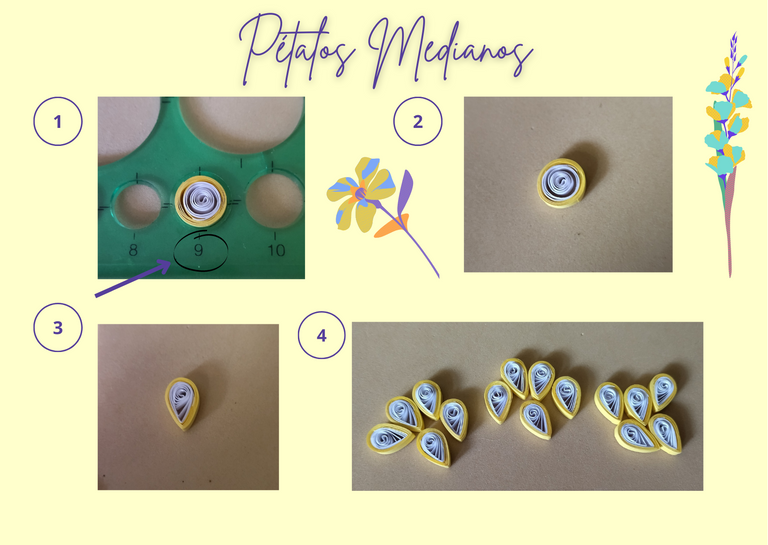
Para la flor mediana (pétalos)🍃:
• Para la flor mediana vamos a realizar el mismo procedimiento anterior pero esta vez, con la cinta blanca de 3mm ancho x 14cms de largo, y la amarilla pastel de 3mm de ancho x 21cms de largo y colocaremos en la regla de circunferencia en el círculo número 9. Para el conjunto que vamos a realizar necesitaremos 3 flores medianas, es decir que vamos a elaborar, 15 círculos abiertos con estas medidas. Ahora procedamos a darle forma de gota a los 15 círculos que hemos realizado al igual que hicimos con los anteriores, que serán los pétalos para nuestra flor mediana, (reservemos).
For the medium flower (petals)🍃:
- For the medium flower we are going to perform the same procedure above but this time, with the white ribbon 3mm wide x 14cms long, and the pastel yellow ribbon 3mm wide x 21cms long and we will place on the circumference ruler in the circle number 9. For the set that we are going to make we will need 3 medium size flowers, that is to say that we are going to make 15 open circles with these measures. Now let's proceed to give a drop shape to the 15 circles that we have made as we did with the previous ones, which will be the petals for our medium-sized flower (let's reserve).
🍃🌼🌼🌼🍃
🍃🌼🌼🌼🍃
• Ahora que tenemos listas todas las gotas pequeñas y medianas, procedamos a armar nuestras flores, para cada flor como dije con anterioridad necesitaremos 5 gotas, tomamos cada una y vamos añadiendo pega y uniendo de manera armónica hasta pegar los 5 que serán los pétalos de la flor.
- Now that we have all the small and medium drops ready, let's proceed to assemble our flowers, for each flower as I said before we will need 5 drops, we take each one and add glue and join them harmoniously until we glue the 5 that will be the petals of the flower.
🍃🌼🌼🌼🍃
🍃🌼🌼🌼🍃
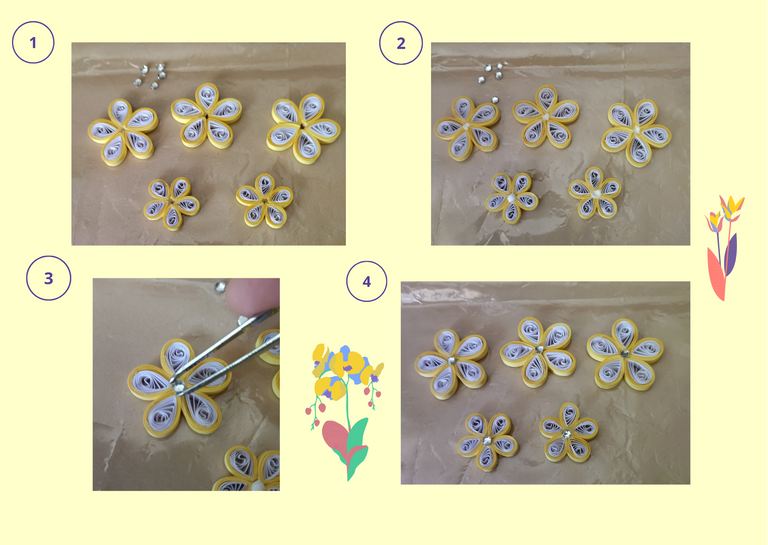
• Ya tenemos listas nuestras flores, para darle un detalle brillante, vamos a colocarle cristal de bisutería en medio a cada una, tomamos la pinza punta fina, colocamos un punto de pega y añadimos los cristales a nuestras flores.
- Now we have our flowers ready, to give them a shiny detail, we are going to place a crystal of costume jewelry in the middle of each one, we take the fine tip tweezers, we place a glue point and we add the crystals to our flowers.
🍃🌼🌼🌼🍃
🍃🌼🌼🌼🍃
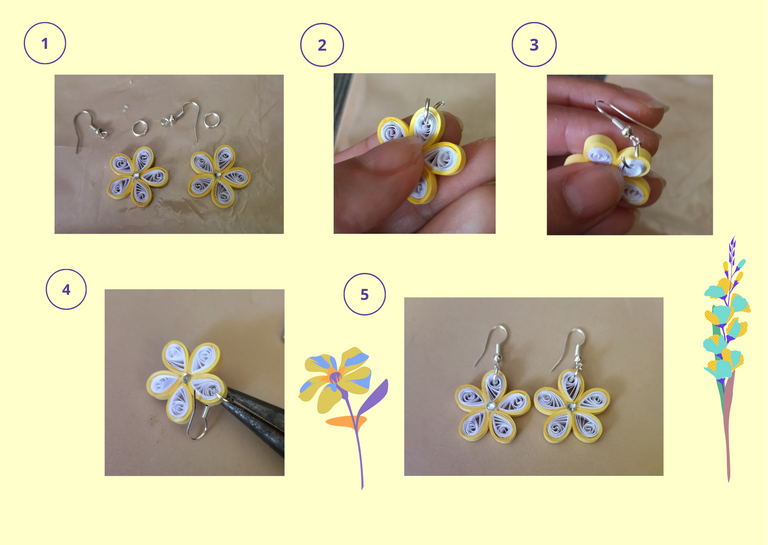
• Vamos a colocarle las argollas de bisutería a nuestras flores, les explico vamos a tomar dos flores medianas que serán nuestros zarcillos, a ellas les colocaremos una argolla en uno de los pétalos, antes de cerrar la argolla colocaremos la base para zarcillos colgante, cerramos la argolla con el alicate punta fina. De esta manera ya tendremos nuestros zarcillos.
- We are going to place the costume jewelry rings to our flowers, let me explain, we are going to take two medium size flowers that will be our tendrils, we will place a ring on one of the petals, before closing the ring we will place the base for hanging tendrils, we close the ring with the fine tip pliers. In this way we will have our tendrils.
🍃🌼🌼🌼🍃
🍃🌼🌼🌼🍃
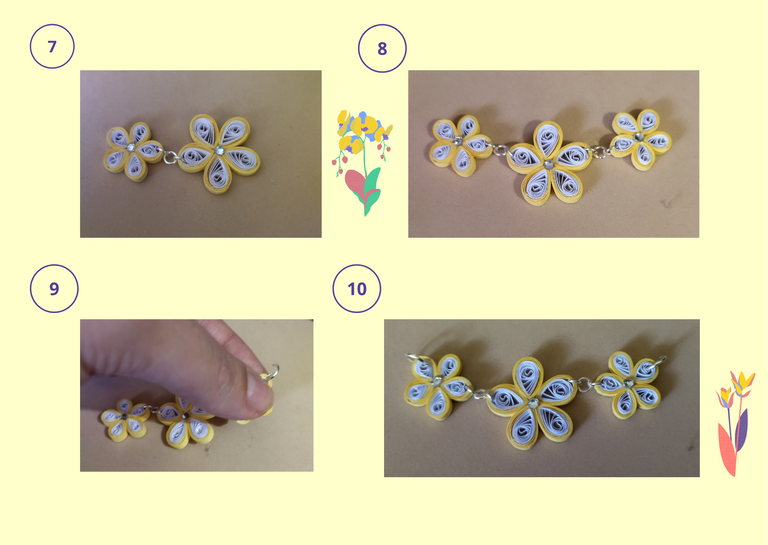
• Ahora vamos a colocarles las argollas a las demás piezas, decidí hacer un collar con tres flores, una mediana en el medio y las dos pequeñas a los lados, comencemos con la flor mediana colocaremos una argolla pequeña en uno de sus pétalos antes de cerrar colocamos otra argolla pequeña cerremos con el alicate punta fina.
• Ahora vamos con la flor pequeña colocamos una argolla pequeña en uno de sus pétalos, y antes de cerrar enganchamos en la argolla adicional que colocamos en la flor mediana, cerramos la argolla con el alicate. Ahora repetiremos el mismo proceso del otro lado de la flor mediana con la flor pequeña restante, le colocaremos sus argollas y cerraremos. Por ultimo colocaremos una argolla mediana en ambos extremos o pétalos, de las flores pequeñas.
- Now we are going to place the rings to the other pieces, I decided to make a necklace with three flowers, a medium one in the middle and the two small ones on the sides, let's start with the medium flower we will place a small ring in one of its petals before closing we place another small ring and close it with the fine tip pliers.
- Now we go with the small flower we place a small ring in one of its petals, and before closing we hook in the additional ring that we placed in the medium flower, we close the ring with the pliers. Now we will repeat the same process on the other side of the medium flower with the remaining small flower, we will place its rings and close it. Finally we will place a medium ring on both ends or petals of the small flowers.
🍃🌼🌼🌼🍃
🍃🌼🌼🌼🍃
🍃🌼🌼🌼🍃
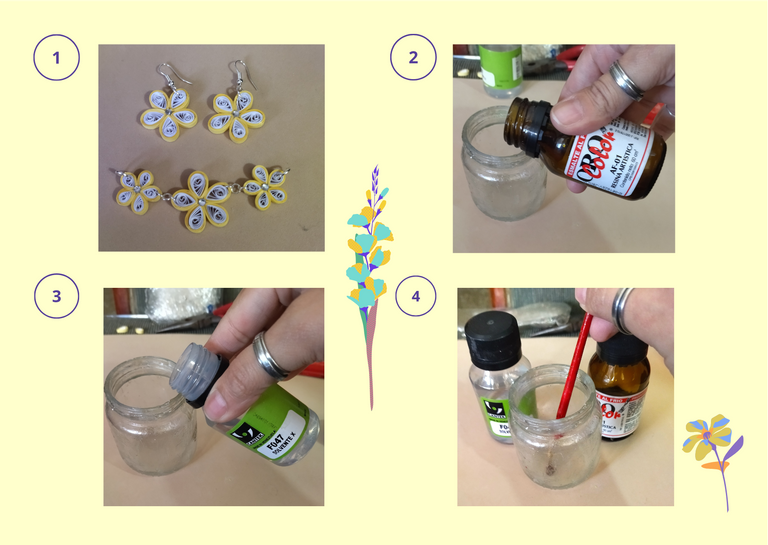
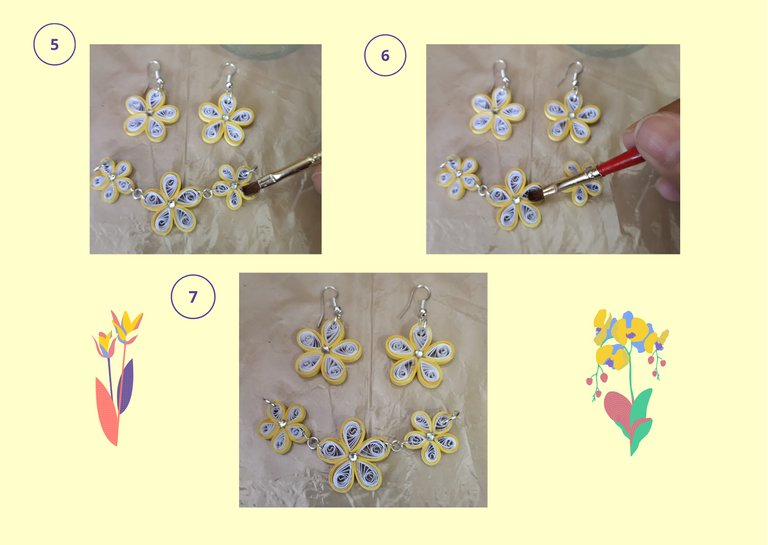
• Ya tenemos todas nuestras piezas listas y unidas, ahora vamos a colocarle su protección liquida, tomamos el frasco de vidrio y colocaremos una parte de resina artística y otra parte de solvente x, revolvemos con un pincel y procedemos a colocarle todas nuestras piezas por ambos lados, dejamos secar un rato, repetimos el proceso y dejamos secar de un día para otro. Ya tenemos nuestros zarcillos colgantes listos, y nuestros dijes de tres piezas, (flores pequeñas y mediana), listas para ser colocada en el collar de su preferencia.
- We already have all our pieces ready and united, now we are going to place its liquid protection, we take the glass bottle and we will place a part of artistic resin and another part of solvent x, we stir with a brush and we proceed to place all our pieces on both sides, we let dry for a while, we repeat the process and let dry from one day to another. Now we have our hanging tendrils ready, and our three piece charms, (small and medium flowers), ready to be placed on the necklace of your choice.
🍃🌼🌼🌼🍃
🍃🌼🌼🌼🍃
🍃🌼🌼🌼🍃
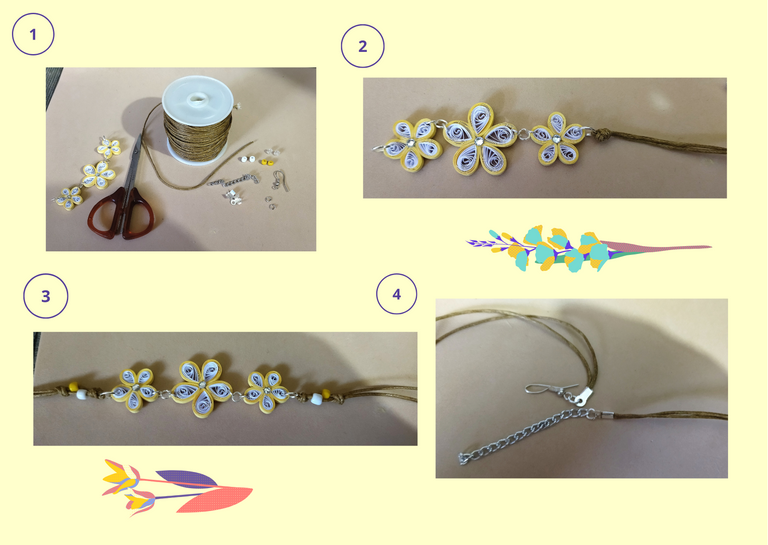
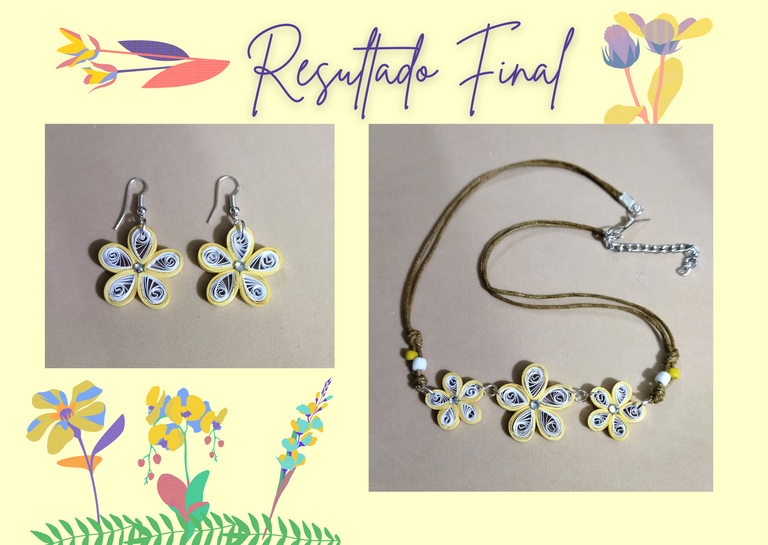
• Para esta pieza decidí utilizar yute marrón claro, algunas perlitas, argollas, tapa nudos y anzuelos para cerrar, y elaboré un sencillo collar doble hilo salido de cada lado de las flores, con unos nudos simples, le agregue las perlitas que les mencione (una amarilla y una blanca de cada lado), para darle mayor vistosidad, y finalice cerrando con su tapa nudo, argolla, anzuelo y cadena.
- For this piece I decided to use light brown jute, some beads, rings, knot covers and hooks to close, and I made a simple double thread necklace from each side of the flowers, with simple knots, I added the beads I mentioned (one yellow and one white on each side), to make it more colorful, and I finished closing it with a knot cover, ring, hook and chain.
🍃🌼🌼🌼🍃
🍃🌼🌼🌼🍃
Resultado Final:💕
Final Result:💕
🍃🌼🌼🌼🍃
🍃🌼🌼🌼🍃
Tips 💡
• Como siempre les he dicho estos dijes los pueden elaborar del color y combinación de su preferencia, bien sea unicolor, dos colores, tres colores todo está en su gusto.
• De igual manera pueden jugar con el tamaño de los dijes, elaborarlos de diversos tamaños o del mismo tamaño, y combinarlos con el collar del color que más les gusté, pueden hacer una sola flor colocarles solo una argolla y tendrán un bonito dije de una sola pieza, y a los zarcillos colocarles una base fija y tendrán unos zarcillos ajustados a sus orejas, solo deja volar tu imaginación.
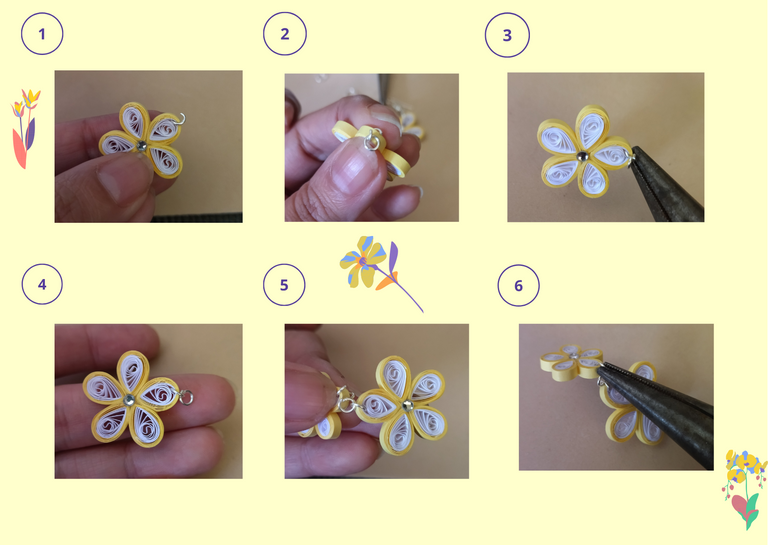
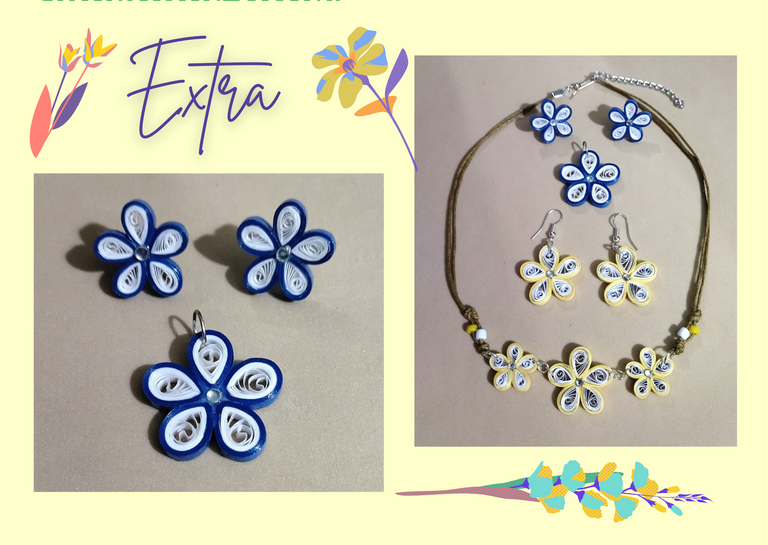
Extra: 💫
Les quise mostrar otro dije de una pieza, con unos zarcillos más pequeños con sus bases fijas, para que vean como lucen y que pueden jugar con los colores, combinaciones, y tamaños.
Tips 💡
- As I have always told you these charms can be made in the color and combination of your preference, either one color, two colors, three colors, everything is in your taste.
- In the same way you can play with the size of the charms, make them of different sizes or the same size, and combine them with the necklace of the color you like the most, you can make a single flower, place only one ring and you will have a nice charm of one piece, and to the tendrils place them a fixed base and you will have tendrils adjusted to your ears, just let your imagination fly.
Extra:💫
I wanted to show you another one piece charm, with smaller tendrils with their fixed bases, so you can see how they look and that you can play with colors, combinations, and sizes.
🍃🌼🌼🌼🍃
🍃🌼🌼🌼🍃
¿Que les pareció, les gustó?
Espero que sí, que les haya gustado mi explicación, procedimiento y fotos, los hice con mucho cariño por y para ustedes.
"Deja salir esa musa que te inspira, y deja volar tu imaginación".
Gracias a todos, nos vemos en la próxima. 🐾🐱💕✨
What did you think, did you like it?
I hope you did, I hope you liked my explanation, procedure and photos, I made them with love for you.
"Let out that muse that inspires you, and let your imagination fly".
Thank you all, see you next time. 🐾🐱💕✨
🍃🌼🌼🌼🍃

All photos used in this post are of my authorship and have been taken on my personal cell phone a Redmi 9T and edited in Canva Dividers and banner made by me in Paint Tool Sai Translated with the help of DeepL

Congratulations @dayadam! You have completed the following achievement on the Hive blockchain and have been rewarded with new badge(s):
Your next payout target is 500 HP.
The unit is Hive Power equivalent because post and comment rewards can be split into HP and HBD
You can view your badges on your board and compare yourself to others in the Ranking
If you no longer want to receive notifications, reply to this comment with the word
STOPTo support your work, I also upvoted your post!
Support the HiveBuzz project. Vote for our proposal!
✨🌼💛
https://twitter.com/Darcy1387/status/1515046876860583936
The rewards earned on this comment will go directly to the person sharing the post on Twitter as long as they are registered with @poshtoken. Sign up at https://hiveposh.com.
✨
Holaa amiga, que preciosuras.. ME ENCANTAAAAAAN😍😍
Gracias mi corazón. Me alegra mucho que te hayan gustado... Abrazos y bendiciones.💕💖
Igual para ti, abrazos, éxitos y bendiciones🤗😘
Muy Lindo tu trabajo.. Felicidades.
Saludos
Gracias por pasar por acá y por tu comentario, amiga @elmundodebetty . Besos y bendiciones...
Hermoso trabajo 💋😍
Gracias por compartir
💋🌼💖🍂🏵️🌺🌻🥀🍄🌷🌹💮🌸💐💜
Gracias a ti mi corazón @chacald.dcymt , por pasar por aquí, y leerme. Me alegra que te haya gustado. Saluditos,,,✨
Que hermosura 😱😱😱🥰😻@dayadam , gracias por compartir este post tutorial tan genial 🌸😱😻🎶🌼🙏
Gracias bella @itzchemaya . Me encanta que te haya gustado. Lo hago con todo el amor del mundo. Besitos y bendiciones... 💖
Te quedó precioso, el juego se ve espectacular. Saludos.
@jessiencasa Muchísimas gracias por pasar por aquí y por tu comentario, me alegra tanto que te haya gustado. Saluditos. 💕
¡Enhorabuena!
✅ Has hecho un trabajo de calidad, por lo cual tu publicación ha sido valorada y ha recibido el apoyo de parte de CHESS BROTHERS ♔ 💪
♟ Te invitamos a usar nuestra etiqueta #chessbrothers y a que aprendas más sobre nosotros.
♟♟ También puedes contactarnos en nuestro servidor de Discord y promocionar allí tus publicaciones.
♟♟♟ Considera unirte a nuestro trail de curación para que trabajemos en equipo y recibas recompensas automáticamente.
♞♟ Echa un vistazo a nuestra cuenta @chessbrotherspro para que te informes sobre el proceso de curación llevado a diario por nuestro equipo.
Cordialmente
El equipo de CHESS BROTHERS
Muchísimas gracias por el apoyo. Es muy grato para mi. Bendiciones. 💕
Como siempre mi querida Daya, todas tus creaciones son increíblemente hermosas y, desearía estar en Venezuela para comprártelas todas. 😞💙
😍💕 Gracias mi @danielapevs bella. Que hermoso tu comentario, me llena de mas ganas de seguir adelante. Pronto Dios nos va a dar la dicha de reunirnos nuevamente, y te voy a hacer todo lo que quieras. Te doy las gracias el doble porque si no fuera por ti no estuviera aquí. Besos y mil bendiciones mi corazón. Te Adoro.💖
Thank you for sharing this amazing post on HIVE!
Your content got selected by our fellow curator @priyanarc & you just received a little thank you via an upvote from our non-profit curation initiative!
You will be featured in one of our recurring curation compilations and on our pinterest boards! Both are aiming to offer you a stage to widen your audience within and outside of the DIY scene of hive.
Join the official DIYHub community on HIVE and show us more of your amazing work and feel free to connect with us and other DIYers via our discord server: https://discord.gg/mY5uCfQ !
If you want to support our goal to motivate other DIY/art/music/homesteading/... creators just delegate to us and earn 100% of your curation rewards!
Stay creative & hive on!
Que hermosura de juego; me encanta el modelo y la combinación que hiciste con los colores te felicito amiga Bendecido día amiga.
Gracias por pasar por aqui amiga bella. Me alegra que te gustará mi juego 😘🌹💗